
Showing posts with label Beauty. Show all posts
Showing posts with label Beauty. Show all posts
Thursday, April 27, 2017
Unboxing/ First Impressions: WOWAFRICAN 360 Lace Frontal 180% Density Yaki Brazilian Wig

If it works, why fix it?
Although I agree that this is true when it comes to my beauty staples, I can't really say the same for my hair. From braids for most of my life to wigs every day for the past two years, I have found something I love.
So, I decided to dig deeper and take a risk in investing in yet another unit; not from RPGShow this time, but WowAfrican.
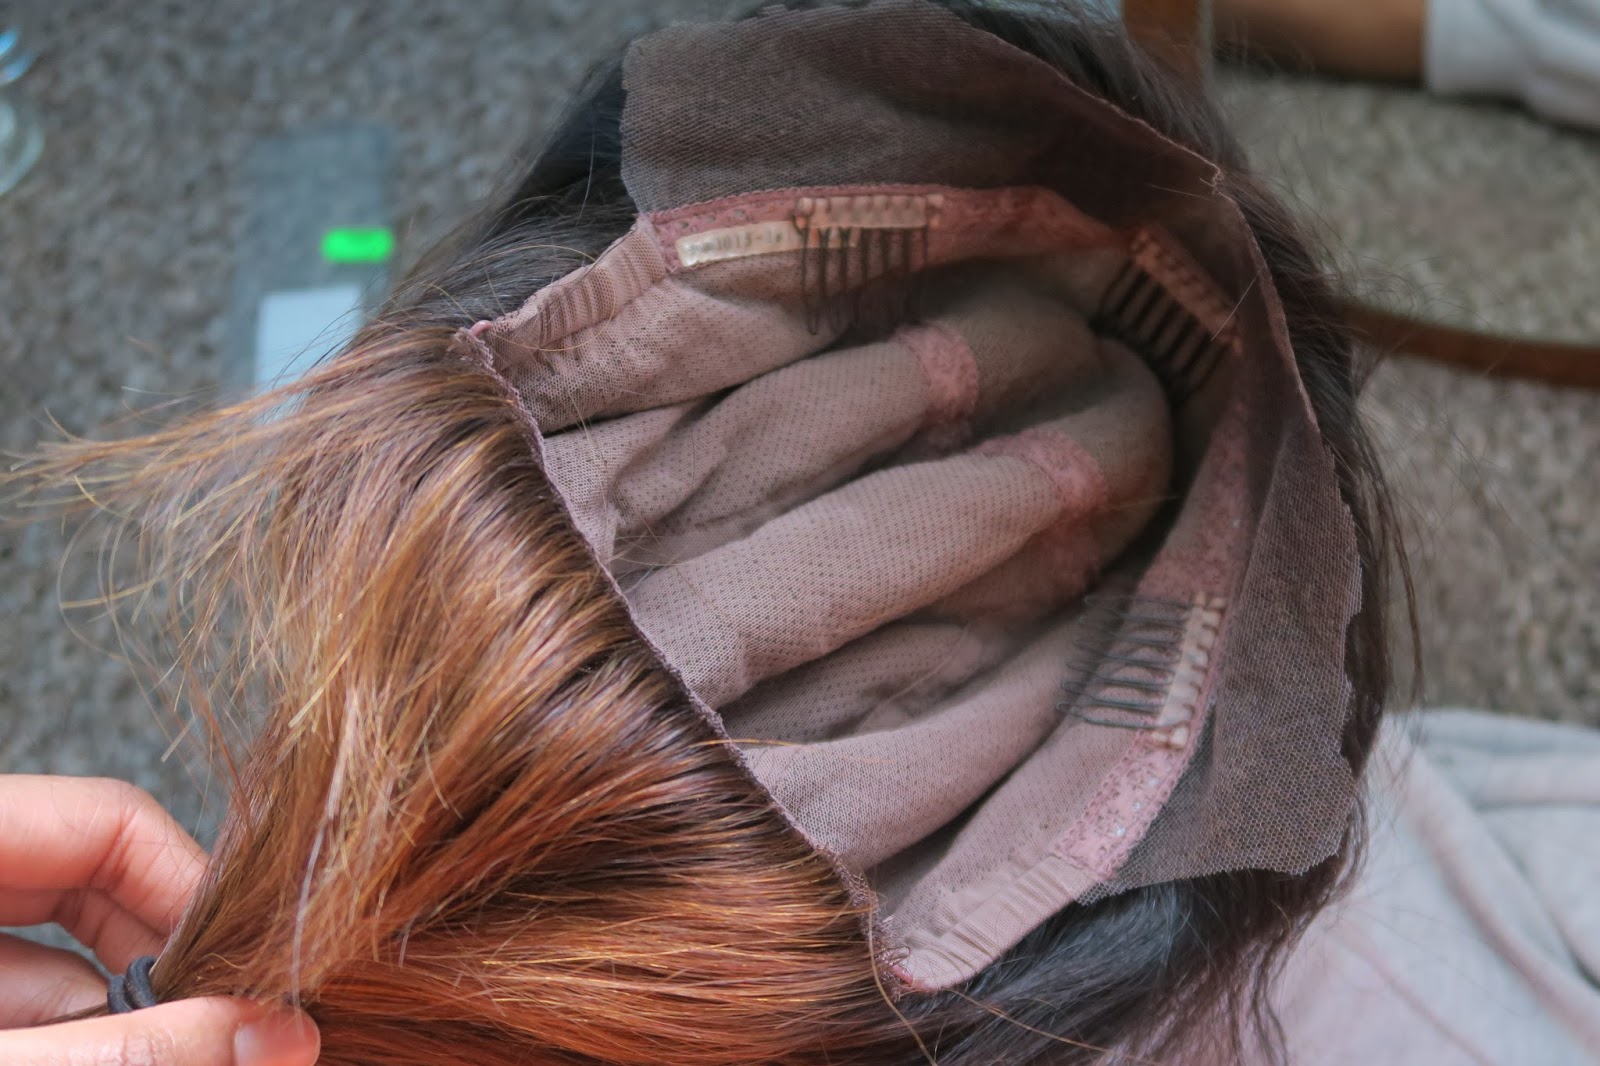
The Box


The wig itself came in a standard cardboard box, packaged fairly well for overseas transport- although mine was definitely stepped on a couple of times.
Unlike RPGShow, WowAfrican do not provide a brush/ comb, but like RPGShow, they did include a wig cap (two actually!) and a brochure for hair maintenance. Another thing in the box was a piece of elastic which can to be used for the now popular "Elastic band Method" which stops your wig front from riding up and showing flesh beneath the lace.
I have seen that prominent YouTubers also get added extras in their packages, but to be honest, a wig calendar isn't exact a VIP addition in my opinion, so I wasn't to sad about not receiving that.
The Hair


My wig details:
Name: 360 Lace Wig Brazilian Virgin hair
Code:TLW07
Style: Yaki Straight
Colour: Natural
Hair density: 180%
Length: 18 inches
Hairline: Pre-plucked
Price: $196.00
I already own two full lace wigs, so I decided to branch out and went for the newly hyped 360 frontal lace wig.
This wig is made up mainly of about 75% tracks, with a lace front of about 2 inches and more wefts at the top of the head .The style gives you the opportunity to maintain thickness of the wig by adding tracks as hair fallout occurs, but limits the ability to split the hair wherever you please. You are free to split this unit anywhere along the circumference from ear to ear, 2 inches deep- everything else isn't possible because of track exposure.
On the plus side, since the wig is a 360 frontal, there is room to wear the wig in an updo hairstyle such as a high bun or ponytail and still maintain the realistic look, which is not possible with an ordinary full lace wig.
On top of that, this unit has a 180% density, in comparison to most wigs which range between 130%-150%.
First Impressions

Does it look real?
Straight out the box, this wig is soft, manageable and looks realistic. My hair is Type 4B/C, yet when my edges are laid with gel and slicked back underneath a wig cap, I can get away with the "growing from my scalp" look.
Although you can see a mesh-like appearance of the lace on first installation, this can be fixed by bleaching or dying the lace to suit the scalp. Personally, I don't believe it is necessary.
Can I do a ponytail?
I tried doing a ponytail but noticed that the back instantly lifted up to expose my natural hair.
I actually have a low nape line than most people which means my nape hair grows lower than most, so I personally would struggle to make the ponytail work. The only way I can see this working is by fastening the back strap as tight as possible and using bobby pins to hide the bunches- but that to me defeats the purpose, but bare in mind that this is because of my hairline.
How should I style the hair?
I took my unit straight from the box, and it was honestly ready to wear. I just geled the pre-plucked baby hairs to fasten the wig to my head and to get rid of that gap between the lace and my scalp. I also fastened a silk scarf around my head for about 10 minutes to allow the gel to set properly.
You can also pluck more of the hairline to your personal preference and use a range of fastening methods including glue or an elastic band, but I find that my method results in the least amount of damage to my natural hair. I wash the gel out of the wig ever other day and condition that strip of hair to keep it nourished.
Overall
I love it. I always feel weird in a new unit but this has grown on me very quickly. Considering my current hair unit is a black to auburn ombre, this is a nice transition back to something that looks normal.
If you are not fussed about wearing your hair in high updos, then I would say don't bother get a 360 frontal and stick to a 360 full lace. However, bare in mind that this unit may shed, but there is that option to purchase more bundles and refill the fallout, whereas on a full lace, once the hair falls out, there is nothing you can do.
Also, I have to say that dealing with WowAfrican was seriously such a good experience. They were very quick to reship to me when I messed up my order and even sent it back to me for free although the wig I ordered was custom!
Fiona x
~

VIDEO: Watch me unbox and fit this unit in my YouTube first impressions video
Sunday, February 21, 2016
UNBOXING: Clarisonic Aria Keith Haring Edition


I've wanted a Clarisonic for as long as I
can remember.
I have had a problem with my skin for quite some time and
the idea of cleaning my face with a sonic brush has always appealed to
me- especially after spending so long in the bathroom scrubbing my face
with a manual face brush.
I decided to
take the plunge this week and invest in one while biting my tongue the whole
way through the checkout process, knowing full well that I could have saved the money for
something else. I placed an order last Monday on the official Clarisonic website and I received the order by the Thursday.
Since I am a little late on the whole
sonic cleansing system hype, I was pretty impressed with the look and
feel of the Clarisonic. I know that the Aria was launched in 2013, as an
upgrade of the previous Mia versions. The Aria is lighter and slimmer and feels pretty solid in the hand.This unit is a little different though as I managed to
get my hands on the limited edition Keith Haring Aria; the cleansing
device is red and it comes with a pouch designed by Keith Haring.The box includes the Mia system and a pouch that holds the USB-enabled magnetic Universal Voltage Plink Charger, wall adapter and drying base, as well as a sample size cleanser.
I'm
in love with the pouch design, the zip tag is in the shape of a mini
Clarisonic and the inside of the pouch is covered in one of Keith
Haring's iconic designs. I love getting these kind of pouches with
purchases because I like to use them as makeup bags, so I think this one
will be going straight into my work bag.
To
charge the unit, you have to use plink charger and wall adapter. The
magnetic charger attaches to the base of the Aria and connects to a wall
socket through the plug adapter. This makes the unit travel friendly-
instead of taking the drying stand, you can charge the unit using only
the Plink charger, which is handy because the drying base is pretty
chunky!
I was pretty impressed with the magnetic function, but I will have to see for myself if this is a gimmicky feature.
It
was a nice surprise to find the sample sized cleanser included in the
pack, although I am a little hesitant to use it. My skin is pretty
normal and doesn't react too much to different products, but since I have
established such a solid skin care regimen already, I wouldn't want to
change it.
I'm pretty excited to use my Clarisonic although I wasn't impressed with the 24 hour charging time- I'm hoping that it lasts for quite a while.
Have you used a Clarisonic? Let me know?
Happy Cleansing
God Bless,

Thursday, December 31, 2015
RPG Show Ombre Wig Unboxing + How I apply wigs!

It is finally the end of 2015! This year was a great year for my hair because I decided to take the plunge to change up my look and invest a little money into a new hair style. Ever since I was young, I would only wear my natural hair or braids, but I decided a little after my birthday in March that I wanted that to change.
Enter RPGShow and the purchase of my very first full lace wig- the "Kylie". Since then I have been thoroughly convinced that full lace wigs are the way to go for a quick hairstyle that remains intact but gives me an opportunity to care for my own hair every day.
My second purchase was made during the Black Friday deals so I managed to get over $100 off, which is actually a bargain. My unit is a full lace ombre unit, part of the stock collection, which basically means that the hair is already available on the website and doesn't need to be ordered.
I really appreciate the RPGShow packaging and contents- I honestly expected my first wig to come in a flimsy plastic bag. The first wig box was black and matte, but this one was pink with black lace. Just like the other box, there was an additional wig cap, hair brush and magazine.


The information for my unit is as follows:
Style Number: ns001-s
Hair Colour: Same as pictured
Hair Length: 18”
Hair Texture: Silk Straight
Lace Colour: Light Brown ( should be medium brown)
Cap Construction: Glueless Lace Cap
Cap Size: Size 1
I love using full lace wigs because of the security and how realistic they look. The wigs comes with three scalp grips on the inside as well as an adjustable band at the back of the head. I rarely use the scalp grips and yet the wig never moves an inch. However, I do secure bobby pins to the sides of my head to stop the unit riding up at the front/centre and creating a gap between my hairline and the wig hairline. I don't think this is a problem for most people, I just have a weird shaped head.


Ombre is a hairt colour that is way out of my comfort zone, but I saw this and instantly fell in love. The ombre is a dark brown/black to light brown rather than a blonde so it is perfect for this time of year. I took a bit of gamble on the hair texture-The "Kylie" unit had a Yaki texture, which is supposed to be similar to an afro texture of hair, whereas this unit is similar to a Caucasian silky hair texture.
However, I love the feel of the unit, it appears to be a lot easier to maintain and is noticeably lightweight/ thinner.


To prepare the wig, you have to remove the excess lace from the forehead, sides and nape. I usually place the unit on my head to get an idea of where to cut first and begin by pulling the hair back into a tight ponytail for accuracy. Then I slide a finger under the wig hairline and pull and cut lace as close to my own hairline as possible to create a cleaner cut. This took forever with my first wig, but once you know what you are doing, this step is pretty straight forward. To cut the nape, you might want to take the wig off, just in case you slip and cut thr ponytail.


Next, I like to pull out some of the hairs along the parting. On cheaper wigs, the parting isn't at all visible and looks extremely unrealistic. Lace wigs have a parting but it is extremely narrow and would look much better if widened. I have seen various methods for this, some people like to use tweezers or even scissors but I find it easier to wrap a couple hairs around my finger close to the scalp and yank quickly. You have to be careful because this method can damage the unit, but it gets rid of hairs a lot quicker. I recommend taking a tiny pinch of hairs at a time.

Lastly I apply a small amount of concealer to the parting that is close to my scalp colour and blend so that the colour of the lace isn't too dark. Currently, I use MAC Studio Finish Concealer in NC45 since my scalp is a cooler shade than my face, however in the summer, I might need something warmer. I like to take a chunk of the concealer and store it in a small pot because it isn't a good idea to mix an oily brush into a face product, unless you are expecting a breakout. The result is a more seamless hairline and scalp.


I have had my Kylie unit since May and it still looks fresh every time I wash and style it- people are convinced I have a whole new unit of hair! Therefore, I think this unit will last just as well, it will be interesting to see how it keeps in comparison to the Kylie because of texture and of course, the length.
I will do an update post in a few months to see how it turns out.
*
Thanks for reading, if you have any questions about the unit, feel free to ask me.
I hope you all have had a wonderful 2015 and I hope you have an even better 2016!
Happy New Year
God Bless,
Monday, May 25, 2015
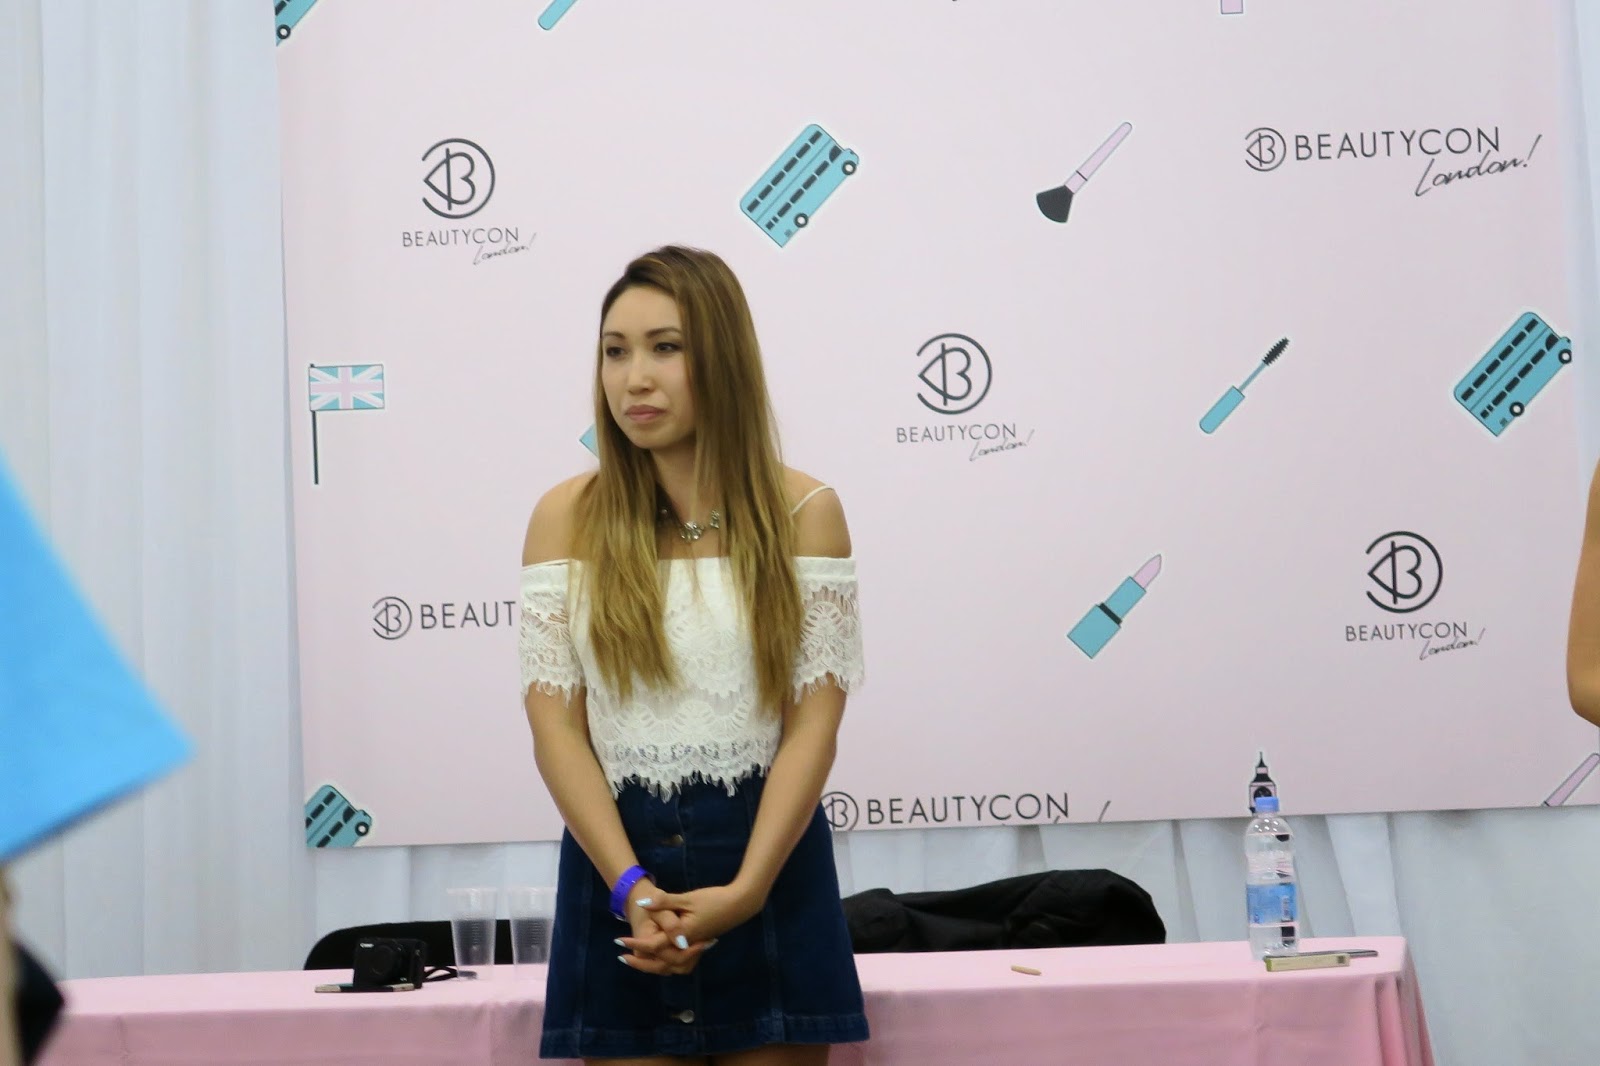
BeautyCon LONDON 2015!
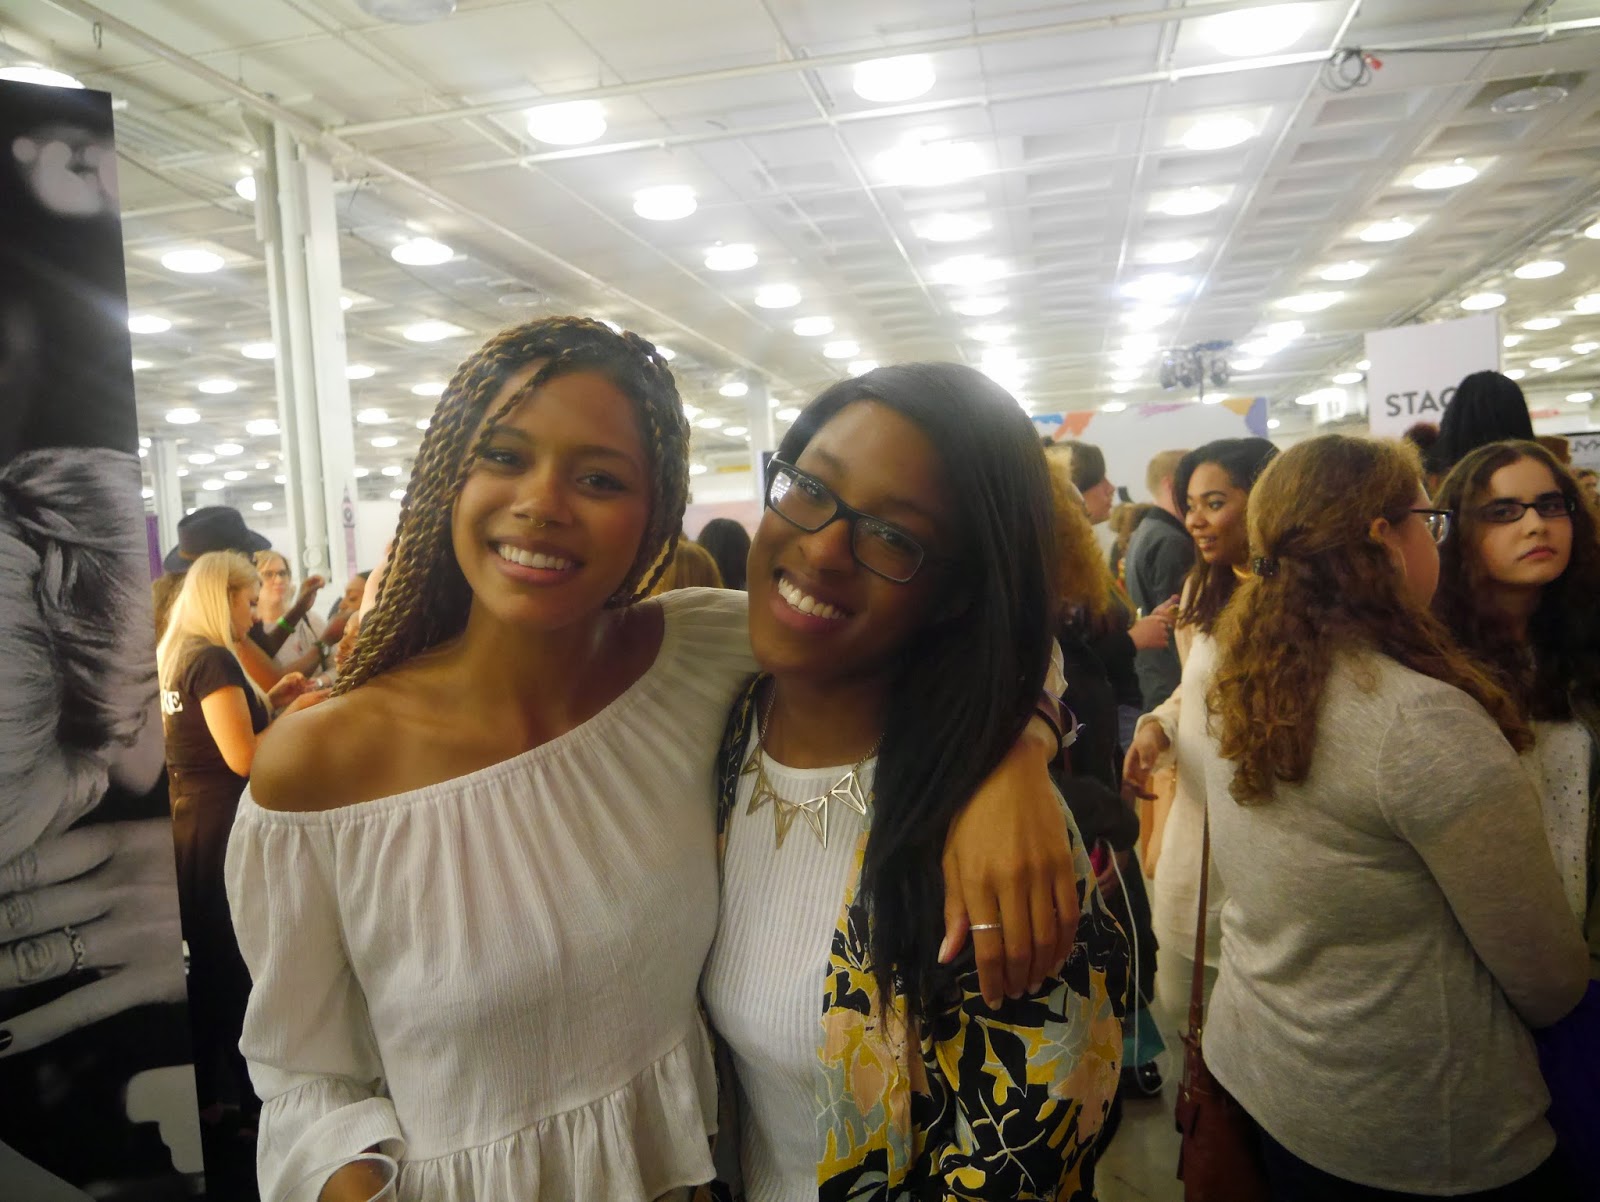
This weekend I was given the most amazing opportunity to head down to the first ever BeautyCon London, thanks to two free tickets from Sammi aka BeautyCrush. Obviouslty, the only other person who would appeciate such an experience was my sister, so we both headed down to the capital from different cities for a day of beauty, freebies and ( most improtantly) YouTuber meetups! Here are the pictures ( watch the vlog version here!)
- T H E J O U R N E Y -


-T H E S E T - U P -
I was absolutely blown away by all the amazing little makeup brand stands and attention to detail to make the London Olympia hall look so...pink. I've never been to one of these conventions before and I was seriously impressed by how pretty everything looked. My favourite spot was the popup polaroid station and The Platform stand which had streaming TVS, a cozy sofa area, neon pink lights and a humungous bright pink glowing heart decor on the wall! I also really liked the beachy Liz Earle stand! Oh, and the random stand alone tables came in use when I needed to sort out all the stuff falling out of my bag!


- T H E Y O U T U B E R S / B L O G G E R S -
I'm not going to lie- the highlight of my day was meeting all the amazing ladies I watch on a daily basis in the flesh. Every single one of them were beyond sweet and pretty genuine! My favourite person to meet had to be Tasha Green because she randomly came over and started a conversation with me and my sister about hair, inspsiration and YouTube ( if you want to see her YouTube advice, check out my BeautyCon vlog!) I of course also loved seeing Sierra and Alisha who I watch without fail, as well as ShirleyBeniang who gives me serious hair and outfit jealousy!
 |
| w/ Lydia Lane |

 |
| w/ my sister, Levi2Jade and her friend (sorry, I have forgotten your name!) |
 |
| w/ Charis Lincoln ( sweetest person alive!) |
 |
| w/ Patricia Bright! |
 |
| w/ my sister, Leanne Lim Walker, Yanin Namasonthi( idressmyself) and Tasha Green |

 |
| w/ Sierra Furtado |
 |
| w/ Shirley Eniang (soo beautiful!) |
 | |||
| w/ Kezia (Shirley's sister!) |
 |
| w/ Tasha |
 |
| spotted Cassey Ho from Blogilates, but I didn't get a chance to meet her! |
- T H E P A N E L S -
I didn't end up staying for much of the panels, because I was way too busy acting like a child at Christmas- I couldn't stya in one place too long! However, I did have a listen to a few panels and it was great to hear from the very best of YouTube and the video making world about how to make it big, how to ignore hate and have a good time as a public figure on the internet!


- T H E M A K E U P + T H E F O O D -
Even though this convention was beauty based, I think I spent most of my time in the back corners queuing to meet people instead of checking out the makeup counters. Although I didn't intend to make any purchases, there were a-lot of tempting makeup goodies around, especially at the NYX counter! Luckily I got my hands on a free NYX lip butter ( which I shall probably be reviewing soon) after completing a quick snap-a-pic-and-post-it-on-Instagram challenge set by the NYX team. I also managed to get a full sized Liz Earle Cleanse and Polish (like literally half of all the BeautyCon attendees) so I will be giving that a try.
I wasn't a fan of the choice of food and without wristbands, we couldn't leave and return so we had to make do with either hotdogs or muffins. The muffin was great anyway!


- A N D T H E N H O M E... -
I had such an amazing time at BeautyCon, I am soo happy that I was one of the lucky people to win tickets! Thanks Sammi! The only downer on the day was the journey back home which took five hours instead of two..I ended up almost getting stranded in another town because my coach home didn't show up! But I got in eventually after taking a one hour local bus ride through all the village country roads- by the time I got home, I was shattered! But not tired enough, because I clearly had a bit more fun with my camera....

Thanks for reading today's exciting post!
Hope you enjoyed seeing what I got up to at BeautyCon. I have a separate vlog video on my YouTube channel as well (make sure you watch it to see Alisha Marie, Claudia Sulewski and Mia Stammer attempt an impromptu British accent challenge set by me!)
God Bless,
Happy Bank Holiday!

Subscribe to:
Posts (Atom)